Showing posts with label Year of Cheer. Show all posts

Monday, 27 November 2017

Update on a Winter Wonder simple classic...

Gosh thought I had shared this ages ago... but apparently not...

When I first shared this Super CAS Winter Wonder embossed card here... I admitted that I would have preferred an additional greeting... but that some of my ladies are rather nervous with direct stamping & heat embossing! So I didn't add anything at the time...
So this was the updated version for the rest of my classes... just the...

All other details as provided here... 

And still loving my Winter Wonder embossing folder for a simple but WOW effect on a card.. this one will be a keeper for sure...


Tuesday, 7 November 2017

Year of Cheer 20th Wedding Anniversary Double Display card

Very quick share today... as I am up to my eyeballs in spray paint!! Minor exaggeration there... but more on that another day...

Here is the finished 20th Wedding Anniversary double display card I made for Jon using the Year of Cheer papers...
Want to make one of your own? Tutorials are linked in this post here...
A Birthday version shared here... And a christmas version shared here...

Tuesday, 24 October 2017

Last of the series... and Round Up...

Oops... got so carried away sourcing and buying for a special christmas project or two... I nearly forgot to post!

Year of Cheer papers brayered in Pool Party... rest of details as this post...
Which completes the series of five simple cards featuring coloured Year of Cheer and Merry Little Labels... with a few Foil Snowflakes thrown in for good measure...

And so now onto something completely different! As I have been very very busy behind the scenes...


Monday, 23 October 2017

Merry Little Labels & Year of Cheer...

Another really simple card with the Year of Cheer gold & white check papers and Merry Little Labels... 

Card and paper sizes as per the previous small square card shared here...
And before I go today... don't forget the Paper Sale we have going on at the moment... Buy 3... get a Fourth for free... select papers only... as shown below... click on the picture to go straight to my Online Shop to select yours... 

And I can't wait to share what I have been making over the past few days with you... a labour of love for 5 very special young adults! Coming soon... 

Saturday, 21 October 2017

Year of Cheer & Merry Little Labels Part 2

Well I lied when I said I had made 2 of the brayered Year of Cheer cards on Thursday's post... I actually made a few more!!

This one is on a standard A6 card blank (again with a 10cm piece of paper) ... so US Letter nearest equivalent being A2 sized with 4" paper...
And uses just half a Foil Snowflake... so you can have 2 for your money...

Rest of the details as per Thursday's post... though I punched a Basic Black 2 1/4" circle to frame the Merry Little Labels greeting instead...

Thursday, 19 October 2017

Year of Cheer & Merry Little Labels

With a good dose of Foil Snowflake thrown in for good measure!

Simple but sweet... and fast! So I made two! Which do you prefer? Black or Pool Party card...
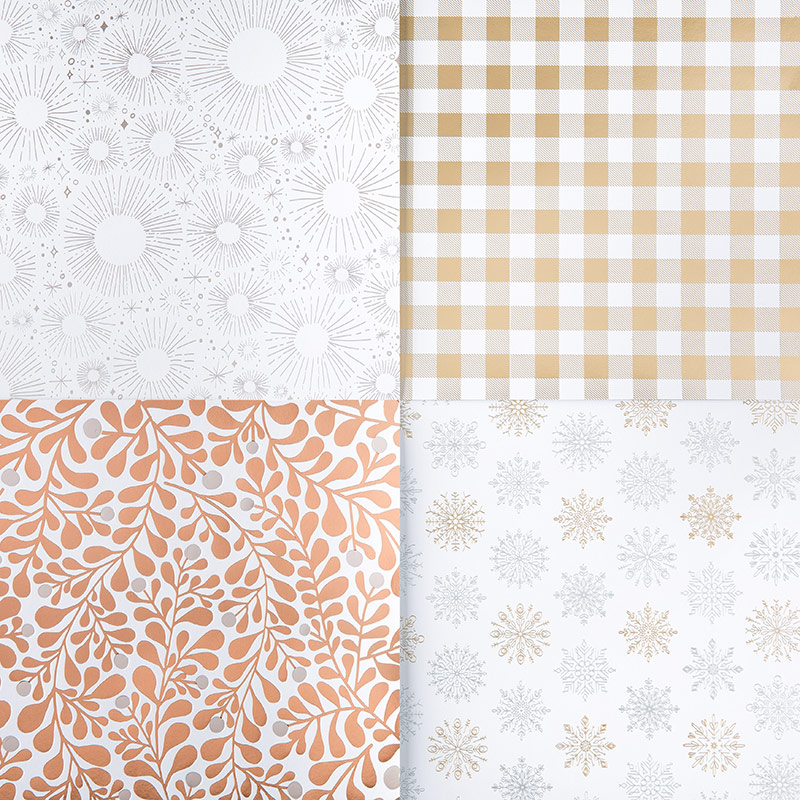
Not recognise the paper? It is the Year of Cheer gold foil & white check piece (top right)... liberally dosed with black ink using a brayer... and then wiped off with a tissue to avoid inky fingers! So shiny still! Such fabulous papers!!
Year of Cheer Specialty Designer Series Paper
10.5cm square card with a 10cm paper panel (or 4 1/4" card with 4" panel if you are using US Letter sized card)
Merry Little Labels greeting gold embossed and punched out with the 2" Circle Punch... Pool Party mat punched out with the 2 1/4"Circle Punch...finished off with a Pool Party 3/8" Shimmer Ribbon bow...

I prefer the Pool Party in the flesh... but looking at just the photos... I prefer the black!

Tuesday, 17 October 2017

Year of Cheer Snowflake Flowers & Stampin Blends Part 2

Following on from yesterday's post with the details... another quick tip for the Stampin Blends (coming soon!) for you...

Want a coloured Foil mat in a colour of your choice? Well now you can... just colour the edge of your Silver Foil mat using your Stampin Blend marker... in my case, dark Bermuda Bay to co-ordinate with my flowers (on yesterday's card!)
Though I will be honest and say that it works well for a thin mat such as used here... but I wouldn't use this technique for a larger area and it goes quite streaky when you have to go over the same area multiple times...

You will also notice that I have a few mats from my one Silver Foil mat. This is one thing I am always frugal with... just line up at 1 cm (or 3/8") on your Stampin Trimmer and cut from 1 cm at the top to 1cm from the bottom, Turn 90 degrees and repeat... and so on until you have cut out a rectangle from the centre. The larger is on today's card whereas the middle one was used on yesterdays...
And another silver embossed Big on Birthdays greeting to set everything off...

Monday, 16 October 2017

Year of Cheer Birthday Flowers with Stampin Blends...

Today's make is a combination of a colour challenge and a few ideas picked up along the way that I wanted to try out...

First up... a Team Color Challenge ... featuring the 2017-19 In Color, Berry Burst...

Oh ... and a mess up on my behalf that I have just realised...as I thought the green to be used was Garden Green!! Oops... please pretend I have used Old Olive... would have been nicer too!

Second up... Year of Cheer snowflake flowers in more typically floral colours... click here for more details on the flowers... Berry Burst sponged all over one of the Pansy Punch flowers...

Third up... the delivery of my new (coming soon!) Stampin Blends alcohol markers... so outlining and colouring with my Bermuda Bay dark & light markers rather than carrying on sponging... I wasn't sure that it would work over the foil detail... but it does! The foil still shines through... And no inky fingers...
And a Clear Faceted Gem quickly coloured using the brush tip end of the dark Rich Razzleberry Stampin Blend for one of the flower centres... just because I could! Though personally I prefer a clear one!
Fourth up... two step Painted Harvest stamped & Leaf Punch punched leaves given dimension with a quick score along the centre using my trusty Bone Folder and thick Stampin Pierce mat... really makes those leaves pop into life...

And Fifth up... oh that can wait till tomorrow!! Though the eagle eyed amongst you have probably already spotted it!
Set off around a silver embossed Big on Birthdays greeting to match the foiling on the snowflake flowers...


Friday, 13 October 2017

A Year of Cheer snowflake is not just for Christmas!

Just had one of those moments!! And loving what it created!!

So I was asked to demo my Year of Cheer Large Square Double Display card in my next class... and I decided it was time I put a Birthday one together... so I didn't want snowflakes...

But the card looked a bit plain on the front... and then it dawned on me...what was to stop me punching out round a snowflake in the Year of Cheer papers with the Pansy Punch... absolutely nothing!! Works SO well...Though you get less pansies than snowflakes for your money...
I daubed Smoky Slate ink around the white pansy... and coloured the second using a sponge and Cajun Craze ink (and a "dauber splodge" in the centre)... finishing off with a quick shape-ing care of my Bone Folder & Thick Mat. Do remember to rub off the excess ink from the foil parts of  a coloured flower with a tissue if you try one at home though!!

A couple of Clear Faceted Gems later... and couple of Leaf Punch punched Champagne Foil Leaves... veined into shape as described in this post... and the decoration was complete...
Happy Birthday die cut from the Champagne Foil mat before assembly... and the silver embossed TO YOU on the front is from Big on Birthdays...punched with the Classic Label Punch and trimmed to size...

Click here for the Christmas version of this card... or here for an Anniversary one (and the links to the Tutorials)

And I know I will be punching snowflake pansies again sometime soon!!

Thursday, 12 October 2017

What's in your Mini Pizza Box....

First of all ... a little update to my pizza box shared here... just the addition of the thin gold Year of Cheer washi tape above and below the thicker one ... makes it really pop!

But you should have seen everyone searching through the box trying to find the very thick gold rimmed washi tape!!

And after searching high and low for something sweet to pop inside as a treat... an almost great creative moment and a laugh for you...
So I found some Frangipannes which are the perfect size... that don't look particularly inviting... but that tasted delicious!

But I wanted to decorate them slightly! There is a white icing disc on the top... so I thought "I could stamp on that".... so I grabbed some food safe pens out of the cake decorating box (years of dust on that box!!) and carefully applied the red pen to a stamp... tried it out on a piece of paper and it worked!!

So over I went again... and stamped on the icing disc... #bigfail... what looked flat wasn't... so only part of the stamp image appeared!! Such a shame...
So I just punched a Year of Cheer snowflake and popped that on for display purposes!!
And I don't need to worry about anyone else eating the paper disc... too nice to get through this evening!! I am in need of a treat!!

And you can have another laugh on my behalf... I didn't want to get my Pizza Box dirty!! So I chopped up the plastic tray that 3 Frangipannes came in and made sure it fit!!

But back to mini cards and envelopes to pop in now!!

Wednesday, 11 October 2017

The Simplified Year of Cheer Wreath card

As a few of you have asked me about CASEing the Year of Cheer & Painted Harvest Wreath card I shared here earlier... I thought I should quickly share the simplified version I have made in the meantime... 

More foil leaves simply punched from the Champagne Foil mat to save time as less stamping... so I used 9 here... though I could punch 10 from that Champagne Foil mat... and there are 4 Copper Foil leaves and 4 stamped and punched leaves...
I did then add veins to every other with my bone folder (using the Thick Mat)... little thing ... huge difference as they say!  And a tip or two for you... do not rush your veining and start from the leaf tip... otherwise most will go wonky!!
And the card itself... just a Large Square card... so mine is a 14.8cm square card (with 14.3cm Foil mat and a 14cm White panel)  ... as that is the largest you can get out of A4 Thick Whisper White cardstock.... so would have to be a 5 1/2" Square if cut from US Letter stock... (with 5 1/4" Foil mat and 5 1/8" White mat)


Wednesday, 4 October 2017

Year of Cheer Gift Bow card


Simple and sweet... the foiled snowflake Year of Cheer papers do all the talking! 

Silver embossed Watercolor Christmas greeting... 
Coupled with a Bow Builder punched Champagne Foil gift bow... punched from the foil mat...waste not want not!

And finished off with a Clear Faceted Gem... saves bending that fiddly little bit around the centre of your bow! 
Couple of tips for when you are punching and assembling bows from Foil Papers... 

(1) stretch the loop parts slowly and many times into shape with your Bone Folder... avoids creasing...

(2) use Mini Glue Dots to assemble... 

Wednesday, 27 September 2017

Season & Year of Cheer Double Display Card

So a remake was on the cards for this one... something for Christmas this time... but using the same Year of Cheer papers, Foil Snowflakes, Clear Faceted Gems and the old favourite Large Square Double Display card fold... 

But a few other details changed as I went along...
Seasonal Layers snowflakes die cut from the Champagne Foil before assembly...

And if you look closely... some of the snowflake waste was used as pin/brad heads at the corners and centres... perfect little detail... so they are all getting saved now!
Die cut Stitched Frames circle used for the greeting.... which is from Watercolor Christmas...and heat embossed in copper... 

Large Foil Snowflakes cut and stuck the other way round...