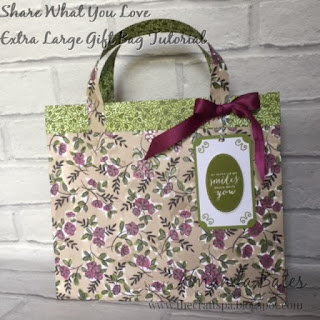
Plus a step by step Tutorial for you too... as well as a link to a Video Tutorial here that was created and shared by my lovely Stampin Up upline (aka mummy), Julie Kettlewell...
But first... the original credit must be given to the lovely ex-Stampin Up-demonstrator, Caroline Hallett... so much so... that this bag was even named the "Hallett Bag"...
But unfortunately Caroline closed down her Stampin Up blog and all its tutorials when she moved onto crafty pastures new... so luckily Julie shot her video tutorial... so that we can all continue to create this lovely bag... as it is one that has been on my To Do list for quite a few years...
You will need 2 pieces of the same pattern of 12x12 paper to create the bag...
Craft Spa Tutorial
REMEMBER THAT YOU NEED TO DO THE SAME ON BOTH 2 PIECES OF PAPER....
1. Place the paper in front of you.. with the pattern in the direction that you want it on the final bag...
2. Turn the paper 90 degrees...
3. Place on the trimmer & line up at 11 1/4" on the Top Bar and chop off the 3/4" strip as your handle
4. Place PORTRAIT on the trimmer (check 11 1/4" along the top)
5. Score at 1 1/4" & 10"
6. Fold over one of these "edges" to form the top of the bag...
NOTE- Think about the pattern direction of the main bag side and foldover section...
7. Adhere this Top edge
8. Place LANDSCAPE on the trimmer (check 12" along the top)
9. Score at 1/2", 1 1/4" & 2" (NOTE - do score from the same side on both pieces)
10. Fold over & Bone Fold...
Bottom = Mountain Fold
Sides = Mountain/Valley/Mountain
11. Cut off slim 1/2" bottom outer section
12. Dart up sides of left and right hand score lines to create a base tab
13. Apply Tear n Tape down long thin 1/2" side tab/section
14. Remove some of protective tape top and bottom so that protective tape folded out...
15. Place down onto flat side of other piece of paper and line up...
16. Pull out rest of protective strip & adhere
17. Repeat for other side
18 . Apply glue onto bottom tab
19. Fold over one bottom edge and stick to glue...
NOTE that the bottom sections don't each totally cover the whole depth of the bag... nature of the design..
20. Tape onto the other bottom edge, remove part of protective strip... and fold over to stick (put your hand into your bag to be able to apply some pressure!)
21. Apply tape about 2 1/2" from either side on the top edge of the bag
NOTE this is different to the 1 1/4" used on my original bag and in Julies video... but the "stresses" were too much... so this way is easier and more robust!!
22. Adhere handles
23. Decorate as required
I used the Large die cut Label from the Share What You Love Embellishment Kit... plus a 9.9 x 6cm piece of card... corner rounded & and tag hole punched with the Detailed Trio Punch... with a simple stamped Oval from the Detailed With Love stamp set... tied onto a handle with 12" of Bakers Twine... and finished off with a bow from 13" of ribbon


No comments:
Post a Comment