Showing posts with label Butterfly Wishes. Show all posts

Tuesday, 18 February 2020

Tuesday TOP Tip! Small Bloom punch...

Well you should have heard me squeal when I realised this alternative usage of the Sale A Bration Small Bloom Punch! It isn't a 100% fit... but at about 98% it will do nicely for me...
Though it's a shame I didn't realise before some of my ladies made these cards last week!! Sorry girls!! No more fussy cutting required of these in the future!!
So worth it's weight in gold to me as I do so love that flower in Butterfly Wishes...  and it makes the Butterfly Wishes stamps an even more amazing set to have!! With two co-ordinating punches!!
And I was so excited I had to quickly make an aperture card (or two!) using my punched blooms and the newly arrived Sending Flowers dies....
Which I ABSOLUTELY love! Lots more to share!!

Though I did also make some cards made using the free Sale A Bration Thoughtful Blooms stamps that actually co-ordinate with this Small Blooms punch!! Which on second look is a real belter of a set! Funny how sometimes you have to use a set to realise it's true potential (or not as the case can always be!)
 

Oh I have had such a busy & creative day!! And I feel like Spring has sprung! I'd forgotten how happy the colour yellow makes me!!

Monday, 27 January 2020

Monday Makeover

 
Upgrading the Parisian Flourish embossed card classic shared last week...

Butterfly Wish flowers in Pretty Peacock, Balmy Blue and Gray Granite
Finished off with Rhinestone Basics Jewels

Simples!

And can't wait to share my Graces Garden makes... series starting soon!

Thursday, 31 October 2019

Tuesday, 22 October 2019

Noble Peacock Birthday Concertina Box Card with Tutorial

So I have a tutorial as requested for you today... today's Noble Peacock card being for a birthday... whereas the previous share here was for Christmas (using Brightly Gleaming) 

But before I start on the Tutorial...

Stampin' Up! are bringing us a One Day Flash Sale starting 11pm UK time tonight... until 10.50pm tomorrow 23 October... 15% off a large range of stamp sets in the Annual Catalogue...
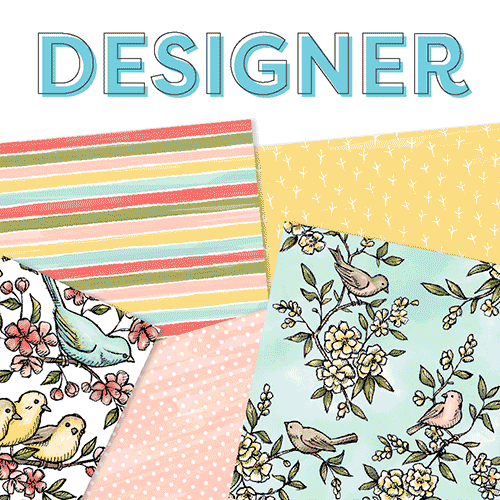
Click on the image below to see all the discounted stamps ... or click here to email me for a full copy if you have not already had an email from me... or the click on the image doesn't work!!!...
And remember to come back tomorrow to place an order... as it's not often that stamp sets get discounted! And don't forget to add this months Host Code MGZDUYGK where prompted... for a free gift from me!
And so back to my Tutorial for the Concertina Card in A Box...

Craft Spa Recipe
Paper 4" x 12"; 4" x 10"
Coloured mats - 1 3/4" x 3 1/4" (x 4 each of 2 colours) 
Whisper White mats - 1 1/2" x 3" (x8)  
Box Lid Bermuda Bay  6 3/8" x 4 7/8"
Box Base Bermuda Bay 6 1/4" x 4 3/4"
3/4" Circle Punch
Papers - Noble Peacock PapersNoble Peacock Foils
Cardstock - Bermuda Bay, Granny Apple Green, Whisper White
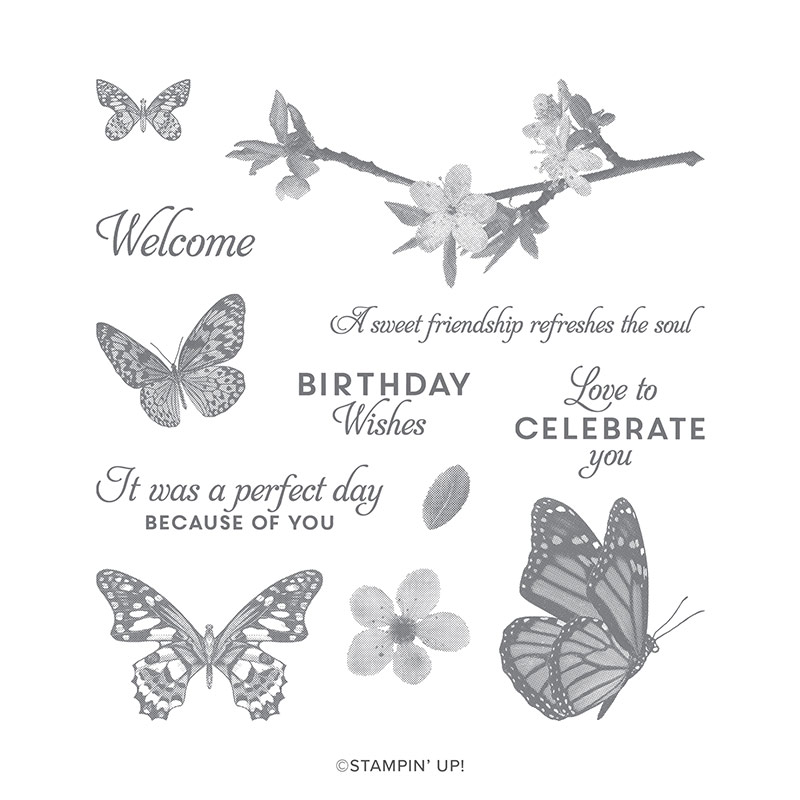
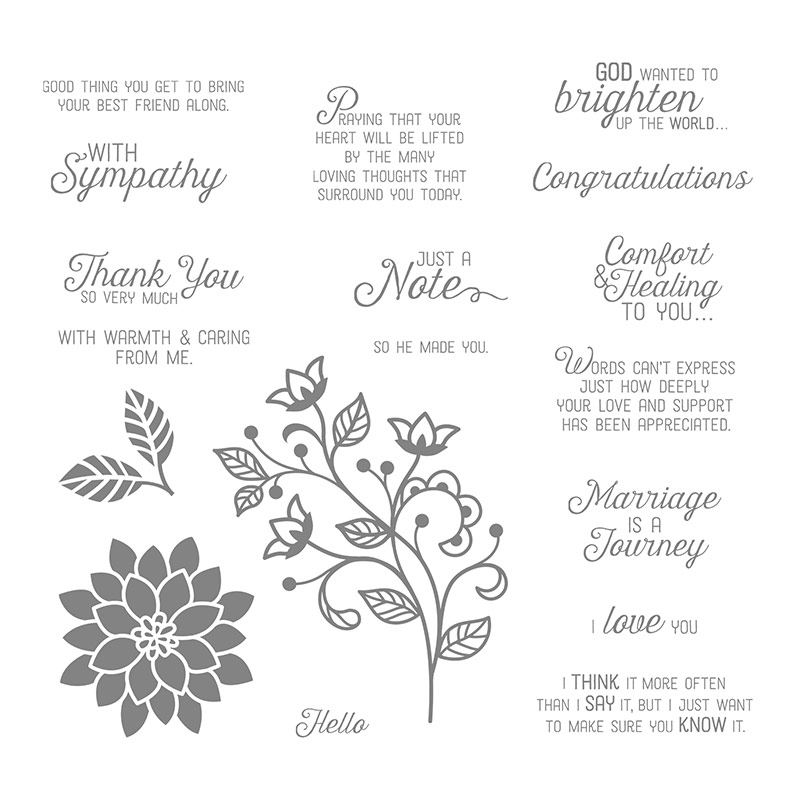
Stamps - Butterfly Wishes, Well Said
Dies - Large Letters (retired - Sorry!)

Embossing Folder - Tufted

Craft Spa Tutorial
1.  Place  12”paper piece LANDSCAPE on trimmer
2.  Score at 2 ½”, 5”, 7 ½” & 10”
3.  Place  10”paper piece LANDSCAPE on trimmer
4.  Score at 2 ½”, 5”& 7 ½”
5.  Bone Fold 12” piece Valley, Mountain, Valley, Mountain
6.  Bone Fold 10” piece Valley, Mountain, Valley

7.  Apply ink to left side/edge of 10” strip if necessary
The Noble Peacock papers used here have a white core so better to ink up with some Noble Peacock ink – I just placed the edge onto the ink pad… and used a tissue to wipe away any excess ink ( as these papers are foiled so the ink will not sink into any foiled parts!

8.  Place 12” section to left and 10” section to right in front of you
9.  Adhere 2 together placing the left hand side of the RH 10” piece over the short width of the LH 12 piece”

10. Score both box panels at 1” on all 4 sides
11. Bone Fold and dart on 2 opposing sides
12. Punch larger box section (ie lid) on 2 longer sides with ¾” circle punch
13. Apply glue and adhere (smaller) Base Box
14. Apply glue and adhere (larger) Base Lid whilst on the Base

15. Adhere sides of Main Card onto Box Lid and Box Base (my Lid is on the LHS, and Base on the RHS)


16. Decorate as necessary.
I die cut 4 
Noble Peacock paper Old Olive letters and 4 Noble Peacock Foil Bermuda Bay letters (which are then embossed using the Tufted embossing folder for a bit of texture!)

But before I go... remember the Flash Sale tomorrow... for one day only...

Saturday, 5 October 2019

Simple Saturday- Sorry You are Leaving...

Sharing another of my simple Gap cards... for which I shared the tutorial yesterday...

This one sent to the lovely Paula Gorry who has been our Stampin' Up! UK Demonstrator Development Manager since Stampin' Up came to our shores in the UK...
Paula will be truly missed by one and all... as her commitment and energy will be so hard to match! But as sad as we are to see her go... she has left us for a lovely life with the start of grandchildren! Can't say I blame you Paula! Such special days ahead... Enjoy!

Using the Noble Peacock papers again... with the Sorry For Everything stamp set for the greeting... and Butterfly Wishes for the lovely flowers...

Friday, 4 October 2019

Fancy Fold Friday - Landscape Gap Card with Tutorial

I think that I warned you that there would be a few versions of the Gap Card...

Todays' is a standard A6 card ... but in landscape orientation this time... and so I have the Tutorial for you today... 
But click here for the A6 portrait tutorial... which has step by step photos if you need them.... 

Using the Garden Lane papers... and other Stampin' Up! products used are Butterfly WishesDaisy Lane & Medium Daisy PunchHealing Hugs, and Frosted Frames dies... 

And I love the fact that these Frosted Frames dies are not just for Christmas! The snowflakes looking like little leaves behind those daisies...
Craft Spa Recipe
Soft Sea Foam 14.8 x 17.5cm
Papers 14.3 x 3cm (x2) 
(D) (Fancy Frame) Mossy Meadow 10.5 x 14.8cm 
(S, D) (Stitched Frame)Thick Whisper White 7 x 8cm 

Craft Spa Tutorial

1.     Large panel LANDSCAPE
2.     Cut at 3.5cm
3.     Move along & score at 3.5cm
4.     Bone Fold
5.     Adhere papers

6.     Put temporary glue on back of small panel
7.     Line up at bottom of main card & temporarily adhere
TIP – use grid paper to aid your eye in getting things all straight

8.     Thinking about where you need your glue, apply glue to top and bottom of fancy die cut frame
TIP – I tend to just use a finger or thumb to eyeball where I don’t want my glue to go…but you can mark the back of the card as shown here…
9.     Adhere the frame

10.            Decorate as required

11.            Rub off the temporary glue (I just used my finger... but the retired Adhesive Remover works a treat too!

Thursday, 26 September 2019

Garden Lane Gap Card

Back to another Gap Card...
This time in the Garden Lane papers... which are one of the packs on the Buy 3 Get a Fourth pack for Free paper promotion running at the moment...
And these papers are worth checking out... as they are suitable for virtually everyone and every occasion in your life... and can be simple dressed with flowers and leaves as and when required!
Click here for the card tutorial... with these Garden Lane papers pictured... though I didn't make the Scrap Card this time as these papers are 12x12 so I could get another card or two from the strip instead!
Other products used are Butterfly Wishes, Daisy Lane & Medium Daisy Punch, Healing Hugs, Leaf Punch, Floral Centres and Stitched Rectangle dies...

Sunday, 1 September 2019

A few Round Ups!

 
So August is done... a really hard month for me... but that is all over now... And back to it... starting tomorrow... I REALLY can't wait to create something... definitely feels strange to not have made anything for a month! And seeing as my mind is so full of memories and photos at present... you may find a new creative line return before the month is over!!

So September brings us the excitements of a couple of things! Starting this Wednesday, 4th September. When I will be back to you to remind you!

Firstly, the launch of the Autumn Winter Catalogue on 4th September.
I have these available ready for collection for my local ladies... and will be posting them to my other regulars this week... But if you would like me to be your Demonstrator just contact me to request a copy for yourself by clicking this link and emailing me...

And secondly, the Stampin Up! Paper Sale...  Buy 3 Get One Free (ie 4th pack free)
But wait... something is different this time round... as you can get a more  expensive, Pressed Petals Speciality paper  pack for free!! Though that it is not compulsory!! Just even better value...
So do make sure you add that one last if applicable! And it is one I highly recommend... a truly great all rounder pack...

Here is a quick video so you can have a quick look at those papers... all from the Annual Catalogue...
And here's the Ordering Information...
ITEM
PAGE
DESCRIPTION
PRICE
149100
166
PERENNIAL ESSENCE 
£10.75
149443
166
SEE A SILHOUETTE
£10.75
149481
167
COME SAIL
£10.75
149484
165
MAGNOLIA LANE
£10.75
149488
165
GARDEN LANE
£10.75
149489
165
FOLLOW YOUR ART
£10.75
149497
165
WOVEN THREADS
£10.75
149589
166
DINOROAR
£10.75
149592
166
BIRD BALLAD
£10.75
149500
167
PRESSED PETALS
£13.00

And here is a round up picture of my simple little Butterfly Wishes trio... pretty as a picture!! Just scroll back a few days to pick up all the details...
And last but not least... Trimmer Blades are now out of stock... everywhere and forever... but remember the good news is that the new Trimmer will be be in my hands by the end of the year... and in yours early 2020... and that is priced at just £23...

Saturday, 31 August 2019

Butterfly Wishes - Branch Extension!

The last of my little Butterfly Wishes trio...  And one where I had to be artistic..

So Direct Marker inking again of the lovely blossoms stamp... and stamping... on the central white panel... and then re-inking and stamping down from the right hand side on the card blank front

But obviously there was a gap! As circled... though I wish that I had thought to take a quick photo...
So I grabbed my Early Espresso ink pad and a Blender pen... picked up some Early Espresso ink (either after a squeeze and pick up from the lid.. or naughtily like me (as I was in a rush!)... direct from the ink pad itself!)...

And just drew a line in... which lines up perfectly with my stamped panel... and which just disappears under the panel/mat...
I laid my stamped white panel roughly in position on the card blank to work out how far I needed to extend that line...

Note that I used the Stampin Blend as I didn't want a perfect straight line... which would have resulted if I had used Stampin Markers or Stampin Blends ...and the Stampin Blends would have gone through my one layer card blank in any case

Friday, 30 August 2019

Butterfly Wishes - Faux Embossing or Shadow Stamping...

Loving it in the Crumb Cake...
With the good old Shadow Stampin or Ghost Stamping or Faux Embossing technique...
Although wishing my white shadow was a bit narrower! Didn't need to move my second stamping ( again using the markers as shown yesterday) down quite so much! But now you  know for when you try...

Wednesday, 28 August 2019

Butterfly Wishes - in the Pinks Part 1


One of a few variants... created using the lovely Butterfly Wishes... featuring some key techniques along the way...

But firstly.... please don't forget to order your Stampin Trimmer Blades (item code 126995...max 3... quote Hostess code WJRJY277 online at 6pm SHARP tonight... More details for you here...

First up... the simple use of markers (Many Marvellous Markers!) to ink up your stamps rather than ink pads... whether greetings or images...
Lovely Lipstick and Mossy Meadow being used here...

And a Quick Tip: Keep the markers as horizontal as you can to protect your brush end...

Sunday, 4 August 2019

Keeping it Simple for Sunday...

Another one of the simple cards in my Noble Peacock foiled papers series... featuring the new Pretty Peacock colour...

And an admittance... I am absolutely fine... but family life has just got "tough"... so I will be keeping my posts short and sweet for a while... that way I can still keep sharing creatively with you... as I have lots of projects made... so it seems a shame not to share them...
Normal service ... with lots of blurb and numbers.. will return as soon as possible...

Thank you for your patience... and continued support of this little ol bloggio...  I really need it at the moment! As it is kinda my Happy Place!
And here are the 2 super CAS cards together (the other one being shared yesterday!)

Saturday, 3 August 2019

Super Simple Saturday Noble Peacock card....

This one definitely created a few oohs when seen in the flesh... Love it when something this simple does that...

Just a 7.1cm (c.2 3/4") square of the stunning Old Olive Foiled Noble Peacock papers... with a  3" (7.6cm) square of the co-ordinating Old Olive Foil Papers ... and a 3 x 7.6cm Whisper White "banner" (1 1/8" x 3"). Set on a Small Square Thick Whisper White Square Card (ie 10.5cm or US 4 1/4")
Embellished with a couple of fussy cut Butterfly Wishes flowers in Bermuda Bay and Granny Apple Green to make everything pop!
The flowers being finished off with the new Noble Peacock Rhinestones... which are so colourful and pretty!
Suitable for anyone... and for any occasion...

This greeting being from Flourishing Phrases... just for a change!