Showing posts with label Bow Builder Punch. Show all posts

Monday, 23 April 2018

Retiring List - So very sad to see these going!

Last-Chance Products
I have been asked by a few people to highlight products I am very sad to see going from the Stampin' Up! range... so I will attempt this over a few parts...

First up... some products that I know I will struggle to create without in the future ahead!! Call them my Top 10 of Retiring Must Haves! Not including any stamps...

Now most of my ladies already have most of these... but if not... please do think about ordering them now... as they will soon be gone... All still available now... but only while supplies last (or 31st May latest) And for my locals... I will be placing my next orders late tonight Monday, 23rd April and then 2nd May...

Just click on the product photo to go straight to the item in my Online Store...

Stamp A Ma Jig... 
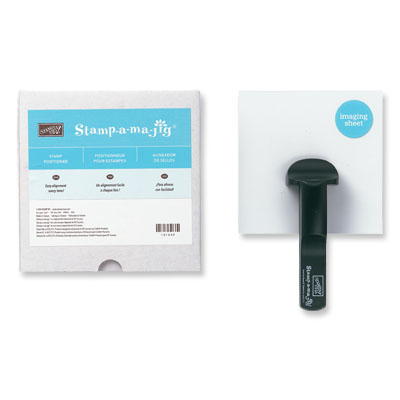
Stamp-A-Ma-Jig
What no stamp positioner to use with our Wood Mount stamps!! 

The new Stamparatus tool is brilliant... but it does not replace the Stamp A Ma Jig for wood mount OR for a one-off greeting... Whilst it will not disappear from use in my classes... life with your stamps at home will not be the same without it!!

And fellow demos... please feel free to add your voice to the Product Sandbox for this tool to continue... I know many of us have already...

Large Numbers dies
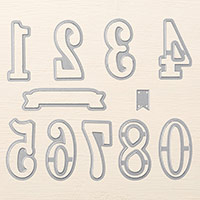
Large Numbers Framelits Dies
Most used dies in classes... and most used by my ladies at home too... what is a special card without shouting out the age or number of years after all!! And the Large Letters will still be available... so if you like to have everything matching... then please get them now...

And fellow demos... Sandbox!? Again many of us have already...

Hearth & Home dies
Hearth & Home Thinlits Dies
GULP!!! Personally my most creatively used dies over the years... a round-up post on these would be very long! Though may have to be attempted before they go!! In the meantime I have linked a few in the sentence below!!!

Not just for Windows (of all shapes & sizes) ... but also for Doors... and Fireplaces... and Wardrobes... and Gates... and iPads... and Tardis... and Telephone Box... and Chests of Drawers... and Super Extra Large Letters!! GULP AGAIN!! Very SAD face on here...

Love these ... and used these... so much... that I actually have 2... can't believe I am going to have to create for classes etc without them... Actually I think I may have to Sandbox again!! Though I think this one is a more personal loss!!!

Brick Wall embossing folder
Brick Wall Textured Impressions Embossing Folder
Gulp again! Perfect for so many of my architectural and flowery creations over the years... and for those wonderful Graffiti cards for the men and boys...

Bow Builder Punch
Bow Builder Punch
So perfect for doing the bow-creating job it does... it will be so missed...

Glimmer Paper
Myths & Magic Glimmer Paper 6 x 6 (15.2 x 15.2 cm)
Now I didn't spot this one straight away... but suddenly I saw a few bulk buys going on!! Yes... the Glimmer Paper as we know it is retiring...

But not all is lost with this one... as there is an alternative coming... described as "thinner"... mmm time will tell... and I will keep you posted as and when I can... but in the meantime... feel free to stock up too... Gold and Clear (Dazzling Diamonds) still available... and the Myths & Magic multi-pack ... but Silver already all gone...

Bloomin Heart dies
Bloomin' Heart Thinlits Dies
Very special... and beautiful... making for easy cards for all occasions... and I know they are still on a few Wish Lists... 

Sweet & Sassy dies
Sweet & Sassy Framelits Dies
Can't tell you how useful I found these recently... again make for super easy cards for all occasions... and I know they are still on a few Wish Lists...

1 3/8" Circle Punch
1-3/8" (3.5 Cm) Circle Punch
One of my very first Stampin Up! buys... and yes I know that there are dies... but they are just not the same as a punch when you just need to quickly punch and go! Mine is still in constant use every week...

Fast Fuse adhesive
Fast Fuse Adhesive
Fast Fuse Adhesive Refill
Whilst this is not my personal favourite... I know that there are a lot of you that are going to REALLY miss this glue system SO much... so please don't delay in stocking up if you have come to love it... Holder and refills still available for us in Europe... though not elsewhere in the world I believe...

Wednesday, 4 October 2017

Year of Cheer Gift Bow card


Simple and sweet... the foiled snowflake Year of Cheer papers do all the talking! 

Silver embossed Watercolor Christmas greeting... 
Coupled with a Bow Builder punched Champagne Foil gift bow... punched from the foil mat...waste not want not!

And finished off with a Clear Faceted Gem... saves bending that fiddly little bit around the centre of your bow! 
Couple of tips for when you are punching and assembling bows from Foil Papers... 

(1) stretch the loop parts slowly and many times into shape with your Bone Folder... avoids creasing...

(2) use Mini Glue Dots to assemble... 

Sunday, 29 May 2016

Beautiful Ride Beetle Gift Card Holder in A Box!

So here is the other version of the explosion box with its tutorial posted yesterday... 
Half my ladies did the boat...and the other half did the Beetle Gift Card Holder....
Everything was the same apart from that centre square... so go here for the main box tutorial (ignoring the For the Boat parts) - and here is the Gift Card holder bit...

1. Cut a piece of 13.2 x 6cm Bermuda Bay cardstock (5 1/4" x 2 1/4")
2. Score PORTRAIT every 1 cm (ie 54321) ( 3/8", 3/4", 1 1/8", 1 1/2", 1 7/8")
3. Concertina fold ( note-valleys on outer and central section)
4 Adhere outer sections on the back .... and about 1.5 cm (1/2") on inside from either side of central section
5. Cut squiggly paper square diagonally
6. Adhere diagonal to outer sections of the gift card holder
7. Trim at ends
8. Adhere to Bermuda Bay Square

Saturday, 28 May 2016

Ahoy There Shine On ... Boat in A Pop Out Box with Tutorial...

Back to another of my All Day projects... I think this was the overall favourite!!
This project was borne from a mixture of my own idea(s) and further inspiration found on the web.... which all came together to form a lovely whole!!
I knew I was going to do a re-sized project (using 12x12 Shine On card) of my  Explosion Box Gift Card Holder (Tutorial & Emerald Envy version here, It's My Party version here)... and I wanted to put a sailing dinghy - or a car - or a bike  - or whatever - for the man each crafter was making for!!

And then I was sent a photo of this fabulous project by Jessica Winter with those immortal words " can we do something like this"... well yes... right up my plan/thoughts street!! The cake quickly becoming that sailing dinghy in my head!!
I then searched for the originator of the project (as I hadn't been sent a link)... and whilst I was looking I happened upon this fabulous project by Doreen... and then all those ideas in my head and on the screen just all pulled together...

Come back tomorrow to see the other version I made for my brother or Dad.... and maybe I should complete that sailing dinghy for hubby too...
And for those of you that love a Tutorial or Two....!

For the Box
1.       Take a 12x12 piece of Kraft cardstock
2.       Score at 4” and 8”
3.       Turn 90 degrees
4.       Score at 4” and 8”
5.       Bone Fold all score lines
6.       Cut 4 corner squares diagonally  (from outside corner to inside square/corner)
7.       Fold & adhere 2 diagonal sections from either side of central section onto the central section
8.       Repeat for opposing side
9.       Do the same for the 2 other central sections but do not glue down totally so as to form the pockets

For the Lid
1.       Cut a 5 7/8” Square of Kraft cardstock
2.       Score at 7/8” on all 4 sides
3.       Dart 2 scorelines on the one side
4.       Repeat for the opposing side
5.       Assemble and adhere the lid on the finished box ( ie the totally decorated box)

Recipe for Decoration
Bermuda Bay Card 9.9cm Square (approx. 3 7/8”) (x10)
Shine On Stripe/Cloud 9.3cm Square (approx. 3 5/8”) (x7)
Shine On Wiggle/Raindrop 9.3cm Square (approx. 3 5/8”) (x3)
Kraft 2.5cm (1”) x 12” (add Washi tape and bow punch to form bow parts)

For the Boat (Beware  - inches conversion not tried and tested!!!)
1.       Die cut 2 Cutie Pie triangles from Kraft cardstock
2.       On one of them, hand punch a small hole for the mast (centrally...about 1/2cm [3/8”] in from straight edge…)

3.       Cut a 16 x 3.5cm piece of Kraft cardstock [6 ¼” x 1 3/8”]
4.    Score LANDSCAPE at 8cm [3 1/8”]
5.       Bone Fold
6.       Hand punch a small hole for the anchor/Bakers Twine

7.       Cut a 22 x 4.5cm piece of Kraft cardstock [8 5/8” x 1 ¾”]
8.    Score LANDSCAPE at 8,16 & 21cm [3 1/8”, 6 ¼” & 8 ¼”]
9.       Score PORTRAIT at 1 cm [3/8”]
10.   Turn 180degrees
11.   Score PORTRAIT at 1 cm [3/8”]
12.   Bone Fold
13.   Dart 1cm [3/8”] section score lines as necessary to form the triangular box (you will know when you get there!!! I produced a template for my ladies to ease the process on the day – this also included a notch to allow for the punched circle for the mast…)
14.   Adhere parts

15. Adhere die cut triangles top and bottom… trapping in some Bakers twine at the peak before assembly)

Stampin’ Up ! Products Used

Stamps - Going Global, Project Life Let's Get Away, Guy Greetings (anchor)
Card & Paper - Shine On Speciality Designer Series Paper, Kraft 12x12 Cardstock, Silver Foil, Bermuda Bay
Dies – Cutie Pie Thinlits
Punches – 2” Circle, 2 3/8” Scallop Circle
Ribbon & Trim – Bohemian Washi Tape, Silver Bakers Twine, Silver Satin Ribbon, Kebab Stick (trimmed for mast)

Monday, 7 December 2015

Peaceful Pines Home For Christmas


Another monthly training make (and it's twin!) I used in my Cozy Christmas & Home For Christmas class... 
Thanks again Julie....
Love this tree...
I also flipped the paper and made this one... 
One card...two ways...
Using my remaining Home For Christmas enamel dots as baubles...
Seemed rude not to....
And here are the pair together again....

Friday, 16 October 2015

Winter Wonderland NOEL - Quad Box Frame Card

Another of the projects from my All Day event last weekend... great card and/OR mantelpiece decoration OR even a hanging decoration if re-orientated... may try that if I get a chance when they are next been made at next week's class....
And seeing as it is Fancy Fold Friday - the directions for you!!!
Make 2 of these...

Attach the 2 duo Box Frame sections together using another 2 x 13cm (5 1/8" x 3/4") panel scored PORTRAIT in half at 1cm (3/8"). 

This time the panel is placed on the back of the 2 duos where they meet at the centre.... fold forward/ie mountain between the 2... adhered flat to the backs... hope that makes sense.... will take a photo tomorrow and add....
I will be back very soon to share the snippity snips of the windows for the NOEL... but technology has  beaten me this week! Which also explains the awful photo quality too!!


Built for Free Using: My Stampin Blog

Tuesday, 31 March 2015

Easter Egg Berry Basket

Amanda Bates at The Craft Spa 573st
Another Easter project kept simple due to the mass production going on this year…. nearly 50 of these were made here last week… that is a lot of Easter Egg & Treats going on!!
This ended up as a great sturdy little basket… not because of using the stapler to assemble but because there is both paper and card on all the sides – and the “spare” 2 x straight sided card strips cut out with the die were also glued together – and used as the handle.
Little thing – huge difference! Actually ended up strong enough for Cream Eggs etc or even Mini Eggs…
Amanda Bates at The Craft Spa 571
We also added a quick insert to the inside to hold up the Easter Egg… didn’t want them flopping over….
Just a 9cm card square (3 1/2”) – scored at 1 cm (3/8”) all round. And punched with the 1 3/4” Circle Punch ( tip – you have to fold over one scored side to get the punch to centre on the internal square!)
Amanda Bates at The Craft Spa 576
And just finished off with a Bow Builder Punch bow…simples… they all looked fab!!
Amanda Bates at The Craft Spa 572
But we did have a laugh…. at some point we realised that if you turned the egg over so that the thinner end is at the bottom… then you looked like you had bought a medium sized egg rather than a small egg!!! Frugal chocolate giving!!!
I hasten to add that the egg in the photo is the “right way up”
SU! Products Used
Dies -  Berry Basket
Punches etc – Handheld Stapler, Bow Builder; 1 3/4” Circle Punch;
Card & Papers – Painted Blooms, Rose Red

Saturday, 14 February 2015

Stacked with Love Chocolate Rose for Happy Valentines Day

Groovy Love, made by Amanda Bates at The Craft Spa 030

Happy Valentines Day!

Just popping on to share a simple make for the 2 boys in my life! Though watching them try to get into the chocolate rose was a hoot!! Rather well sealed at the top…. which I knew – because I had planned to change the leaves in the tube…and I gave up trying to get in…..

Couple of chocolate roses I picked up from my favourite bargains store! Wrap Stacked with Love paper around them. Made a bow using the Bow Builder Punch. 5 minutes later & there you have it!

And a couple of Tiny Treat boxes – one of which I shared earlier – crammed full of yummy wrapped chocolate hearts & caramel hearts. Two happy boys today…. 

But it was a shame there wasn’t enough room for all the chocolate when I packed them….yum!!