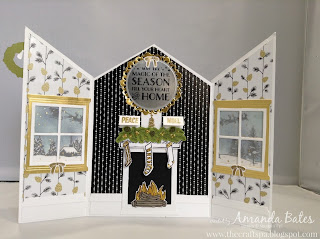
When I posted this card a week or so ago.... I had lots of emails and messages offering to pay me for a tutorial (thanks - I love that concept!)... but the card itself is somewhat simple as it is just a gatefold card with an extra cut or two!
So I thought I would just post the details for you all on here... though if anyone would like to make a Paypal contribution to thecraftspa@gmail.com - then I would be delighted! LOL....
So the card blank is formed from just 1 piece of A4 Thick Whisper White card ... So all of the measurements are to suit! ie my made/tested measurements are the metric (centimetres) ones...
For those of you over in the States - I have calculated & added the inches measurements for US card 8 1/2" x 11" size ... but they are not tried & tested! Reader beware!
1. With Whisper White A4 card LANDSCAPE - Score at 7.4cm (2 3/4" US)
2. If using your Simply Scored & Metric Plate - Turn 180 degrees - Score at 7.4cm ( 2 3/4" US)
(or if using trimmer - you can score at 22.3cm - 8 1/4" US)
3. Bone Fold to form Gatefold Card
4. Mark at 4.6cm (2" US) down each side from top of card
5. Cut from mark to Top Centre of card blank
6. Card done!
7. Trim paper using your cut off card bits. The papers are 20.5cm high. Central 14.2cm. Sides 6,9cm
(US 8 1/4" H. Central 4 3/4". Sides 2 1/2")
8 Stamp & die cut as necessary...
The bows are gold embossed
The stockings are decorated with Gold glitter glue
The fire is water-coloured using Tip Top Taupe and Delightful Dijon - then Gold Glitter glue added
The scene is stamped then sponged using masks and Lost Lagoon ink
The greenery is stamped using Mossy Meadow ink on Old Olive card ( pine cones over-coloured using Early Espresso marker pen and then coloured in using Tip Top Taupe marker) and the wreath has Real Red berries added
9. Die cut 7 Whisper White & 2 Gold Foil Windows
10. Make 2 front doors from 4 white window die cuts
11. Make 1 fireplace from 1 white window die cut
12. Make Skirting board parts from 2 white window die cuts. the 3 panels are 2 cm high - one 14.2cm ( US 4 3/4"), the other 2 being 6.9cm (US 2 1/2")
13. Make 2 windows (the 2 white frames being from the skirting board windows)
14. Make the mirror... the Circle Framelit is the 6 cm ( 2 3/8") one... the Smoky Slate circle is a 2 1/2" punched circle
Note I had to use a Silver Metallic Foil Doily in these photos ( instead of the gold one in my project)- as the Gold Doily cupboard is bare....
15. Make the 3 little cards - all gold embossed... the wording ones are scored LANDSCAPE at 1.5 cm (5/8" ish...very ish!)
16. Decorate your roof... the central part is just the scrap part from a 2 cm (3/4") wide strip punched in the Triple Banner Punch...but this may not be such a perfect fit for a US card - maybe 5/8" strip?)
Forgot to take a photo of the piece.... but I just doodled the central section to match my roofline...stuck it on the left hand side of my card...then trimmed in half... and stuck the right hand side onto the right hand side... hopefully you can see on the blurry photo blow...
However if you find the thought of that tricky doodling too much...here is a plain white version....
17. Add your doors and Iced Rhinestone door handles
18. Decorate your Fireplace
19. Voila!


10 comments:
Simply stunning card. Love it to bits!
Anna x
Thanks Anna.... Glad u love!
Beautiful card! So wonderful for you to share how you made it!
Thank you Kim... My pleasure!
Absolutely beautiful card. So impressive.
Thanks Alison. So glad you like!
Love the card! I always make something special for the immediate family members at Christmas and this year I only have two to make so this is it!
Have a question - the fireplace - did you use the window with the cross bars cut out? In the picture it look narrower than the windows, may just be an illusion since the background is wider for the center than the side flaps.
And a tip for people using 8 1/2 x 11 - when scoring the card base, the 2nd score measurement should be 8 1/4" so both flaps measure 2 3/4".
And since the flaps are only 2 3/4", the DSP has to be cut to cover them completely (no border) because the window measures 2 3/4" wide.
I haven't started making one yet, just reading your directions, but I may switch to 12"x12" CS and cut it to 12"x8 1/2". Then you would score at 3" & 9", you'd then have room to make a border around the DSP.
If it works out, since I don't have a Blog, I'll e-mail you a pic of mine.
Thanks so much Lisa... quickly amended my 8 1/4" typo! Cough!!! Yes the fireplace just has the cross bars snipped out... must be an illusion! Would love to see your version from 12x12 cut down... I think that is the way I would go too without our A4 card...though I would probably add a thick whisper white panel behind my front doors just to stiffen up the front of the card...
Hi Amanda!
What a gorgeous card! I suddenly was inspired and built my own version. Thank you for this gread idea!
http://made-by-maggie.blogspot.de/2016/01/happy-new-home.html
M@ggie
Thank you so much Maggie...love your take... so delighted to have suddenly inspired you to make it.... Fabulous....
Post a Comment